Table of Contents
Setting up DVR storage on a Windows computer
Requirements
Before you continue, make sure you have the following:
- One or more compatible HDHomeRun device: see List of DVR compatible HDHomeRun devices
- Windows 7, 8.1, 10, or 11 PC (Windows 10/11 preferred. Windows 7 and 8.1 can only run the DVR storage software and not the official HDHomeRun viewing app)
- Sufficient disk space to hold recordings. HD content typically runs around 6GB per hour, so a 500 GB hard drive for recordings is a good minimum to have.
- PC must be on at all times in order to make recordings or access previously recorded content. Sleep mode should be disabled.
- Wired network connection. The DVR will handle a great deal of video traffic, so wireless connections should be avoided.
Install the storage software
Step 1
Download the Windows software: The latest download for Windows can be found here: http://download.silicondust.com/hdhomerun/hdhomerun_windows.exe
Step 2
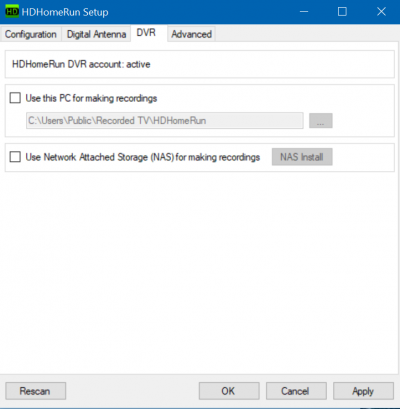
Run the program you downloaded in the previous step. At the end of the installation wizard, the HDHomeRun Setup program will open. If you need to change the DVR settings in the future, you can find the HDHomeRun Setup program on your Start menu in the HDHomeRun folder.
Step 3
Step 4
Click OK to enable the DVR and close the HDHomeRun Setup program.
Step 5
And you're done! You should now be able to record using the HDHomeRun app.
Note: the record location must be on a drive that is physically connected to the computer. Do not attempt to record to a shared drive on another device. Limitations in the Windows file sharing protocol will cause problems for the DVR.
Note 2: the drive you are recording to must be using a filesystem that supports large files. For internal drives, we recommend NTFS. For external drives, we recommend exFAT. FAT32 will not work.
Troubleshooting
App won't access DVR on same PC
By default, Windows 10 blocks Windows Store apps from communicating with other apps/services on the same PC. This can prevent the Windows 10 app from finding a DVR running on the same PC. The HDHomeRun installer changes a setting that should bypass this issue. Should you find that you can access the DVR from other devices but not from the Windows 10 PC it is running on, do the following:
- Right click on your Start menu icon and choose Windows PowerShell (Administrator) or Command Prompt (Admin)
- Run the following command:
CheckNetIsolation LoopbackExempt -a -n="ef712ba7.hdhomerundvr_23nna27hyxhag"
DVR not accessible from Windows 7/8.1 app
The HDHomeRun app for Windows 7 and 8.1 does not support the DVR.
Multiple drives on Windows for DVR
A third party program such as StableBit DrivePool can be used for Windows that creates a single large filesystem (NTFS or ReFS) from multiple hard drives. You can easily expand the filesystem by adding more drives as you want more space - perfect for DVR use.
DrivePool: https://stablebit.com/
To work with HDHomeRun DVR you need DrivePool version 2.2.3.946 or newer.
Next step: Using DVR in the HDHomeRun app
Once you finish setting up a DVR storage device, see our guide link below for instructions on using the DVR features in the HDHomeRun app.
