This is an old revision of the document!
HDHomeRun app
- Live TV - All HDHomeRun customers have free access to our app, which includes program summaries, 24 hours of future program data, searching for current and upcoming programs, pausing live TV (up to 60m, req 2+GB RAM), and rewinding live TV (up to 5m, req 2+GB RAM).
- Recording - Customers with a DVR subscription ($35 USD per year) can access additional recording features. Recording provides an additional 14 days of programing data, longer live TV pausing and live TV rewinding, and recording that is only limited by the number of available tuners you have (multiple HDHomeRun tuners can be used on the same network) and the amount of DVR storage you have available (multiple DVR storage devices can be used on the same network).
- All devices using the HDHomeRun app can set recordings, and all devices can access any recording made.
- If multiple users are using the HDHomeRun app on the same channel, the DVR storage engine will distribute the load so that only one tuner is used for one channel. For example, if 3 people are all watching the same TV channel on their individual iPads, only one of the two CONNECT DUO tuners will be used, allowing the other tuner to record or view another channel.
- Watching a previously-made recording will not tie up an HDHomeRun tuner.
Using the app
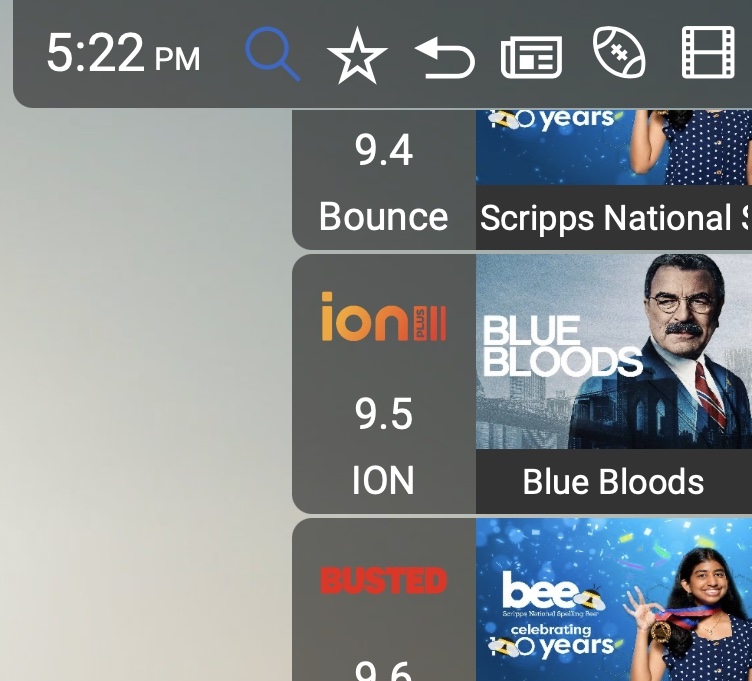
App: Live TV tab
 Remote Control or Keyboard:
- While no controls are visible on screen (Press back/exit/escape to clear visible controls from the screen):
- UP / Down - Opens the right-hand Slice Guide for channel changes (or the grid guide if you disable the Slice Guide in settings)
- While in recording playback, UP / Down will seek in 10 minute steps
- LEFT / RIGHT - Seeks when viewing a recording or when you have paused live TV and have a buffer to rewind and fast forward through
- SELECT - Brings up the action bar with “Play/Pause” selected, so that you can press “Select” twice to quickly play or pause. From here you can navigate to the other action bar buttons.
- BACK - Exits to the Recorded/Discover/Tasks/Settings screens
Touch screen / mouse:
- Touch anywhere on Live TV to bring up the on screen controls and action bar.
- Press any empty space to dismiss the controls and action bar.
If your keyboard has dedicated multimedia keys, those will also work.
Action Bar:
- VOLUME - control volume.
- When using a remote control or keyboard, select the volume icon and press select/enter to mute/unmute, and press up/down to change the volume
- REWIND - 10 second step
- PLAY / PAUSE
- FAST-FORWARD - 30 second step
- RECORD - Records current program if user has DVR set up.
- SAP - Secondary audio programming (other languages, descriptive audio, etc)
- Closed Captions - Toggles Closed Captions/subtitles on/off
- Zoom/Fullscreen - zooms picture to fill screen, such as for programs that are a different aspect ratio OR places the HDHomeRun app into full-screen mode
- Back to Menu - Exits to the Guide/Recorded/Discover/Tasks/Settings screens.
- When using a remote or keyboard, if you keep going RIGHT you will be able to select the Slice Guide search and filter options, described below.
Slice Guide:
- SEARCH - Jump to slice search for program, network, or channel-based search. For keyboards or remotes with number pads, just start typing to trigger search. You can use this to switch to a specific channel number, channel name, or even show title. For example, using a remote with a keypad, you can enter “1004” + ENTER and it will switch to channel 1004.
- FAVORITES -
- RECENT channels -
- NEWS filter -
- SPORTS filter -
- MOVIES filter -
 Grid guide:
- When no on-screen controls are visible, pressing the Back button on a remote will show the grid guide by default.
- When on-screen controls are visible, selecting/tapping the “X” button will also show the grid guide by default.
App: Recorded tab
 In the RECORDED tab you can find all recordings made by all of your connected HDHomeRun DVR storage devices on your local network, if you have an HDHomeRun DVR subscription. Recordings are organized by “All recordings”, “Shows”, and “Movies”.
The DVR system remembers where you stopped watching and will let you resume on another device. For example, if you were watching a recorded movie on your TV via your Xbox One, you could stop the video, go into another room, and resume watching on your iPad.
 Episode view:
When viewing a TV show, news program, or sports with multiple entries, then you will see a list view below the program summary. On the left-hand side you will see a selection by season or year, which also includes “Upcoming” and “Recent” sorting options:
- Upcoming - live and future airings of that program.
- Recent - most recent recordings, sorted by newest, for that program.
Selecting/clicking a program will play that program. Pressing the right arrow on a remote control, or clicking the right arrow icon on the ride-hand side of that row, will show additional options for that recording:
- Record this airing - If the selected program will air in the future, you will also see time, date, and channel number for those future airings. Selecting those airings can set up a one-off recording.
- Auto-record - will open the series recording options if you have the Full Guide subscription.
- Watch from start - will start the recording from the beginning (in the case the the program was already being watched).
- Delete recording - will delete that specific recording from the DVR storage device.
 Deleting a recording:
Pressing to the right of a row will open a menu of actions to take on that recording. Select delete and this will present three options:
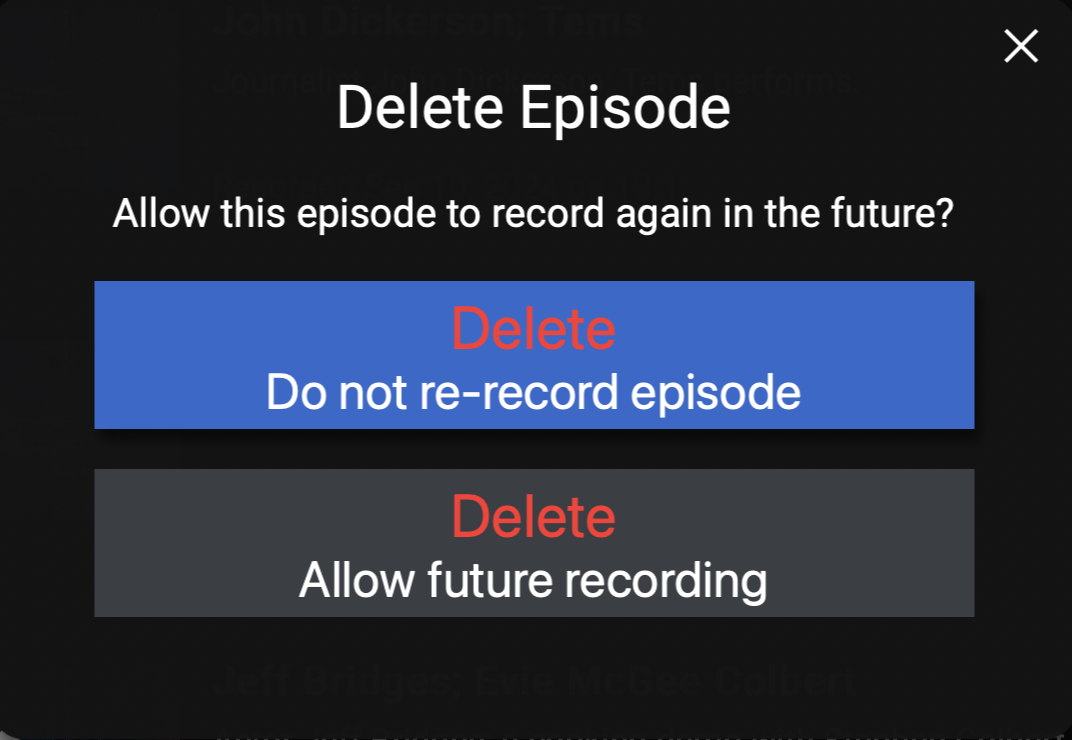
- Delete / Do not re-record- Deletes the recording and prevents that episode/movie from being recorded again, unless specifically selected for recording in the guide (using “Record this airing”)
- Delete / Allow future recordings (re-record) - will re-record a specific movie or episode at a later time if you still have a recording task for that program. Useful in case a given recording had an issue, such as if a programming error occurred or a storm had caused reception issues.
If you delete the actual file off of your DVR storage, instead of deleting the recording through the HDHomeRun app, it will behave like the “Allow future recordings” option.
App: Discover tab
 DISCOVER:
The DISCOVER tab breaks down into four views/filters:
- NOW - Shows programs that are currently live on TV. Scrolling down will view more programs that are live. Scrolling to the right will bring up additional programs (3 days for normal users, 14 days for Full Guide subscribers).
- Shows - Filters to just TV shows.
- Movies - Filters to just movies.
- Sports - Filters to just sporting events.
Users can also use the search box to look for specific programs.
Selecting a program will bring up information for that program, where they can switch to that program (if live) or set a recording.
Scrolling to the right in the NOW view will bring up additional programs (24 hours for normal users, 14 days for DVR subscribers).
Scrolling down will show more programs for that time slot.
Episode view:
When viewing a TV show, news program, or sports with multiple entries, then you will see a list view below the program summary. On the left-hand side you will see a selection by season or year, which also includes “Upcoming” and “Recent” sorting options:
- Upcoming - live and future airings of that program.
- Recent - most recent recordings, sorted by newest, for that program.
Selecting/clicking a program will play that program. Pressing the right arrow on a remote control, or clicking the right arrow icon on the ride-hand side of that row, will show additional options for that recording:
- If the selected program will air in the future, you will also see time, date, and channel number for those future airings. Selecting those airings can set up a one-off recording.
- Auto-record - will open the series recording options
- Watch from start - will start the recording from the beginning (in the case the the program was already being watched).
- Delete recording - will delete that specific recording from the DVR storage device.
Deleting a recording:
Pressing to the right of a row will open a menu of actions to take on that recording. Select delete and this will present three options:
- Delete - will confirm the deletion and permanently delete the recording from your DVR storage.
- Re-record - will re-record a specific movie or episode at a later time if you still have a recording task for that program. Useful in case a given recording had an issue, such as if a programming error occurred or a storm had caused reception issues.
- Cancel - will back out of the deletion process.
If you delete the actual file off of your DVR storage, instead of deleting the recording through the HDHomeRun app, it will behave like the “Re-record” option.
 Search:
Content in the DISCOVER tab can be searched, which is useful for finding currently airing programming, as well as future programs for setting recordings.
Recording status marks:
If you have a DVR subscription and are using the recording features, the following marks will appear on upcoming programming details:
- Red dot - will record
- Gray dot - second showing of something scheduled to record. If the red dot channel fails at the time of recording, a gray dot channel can be used as a “backup”.
- Green tick - already recorded and exists on the DVR
- Gray tick - recorded and deleted, which tells the DVR to not re-record, unless the individual episode is selected for recording. This “don't re-record” history can be reset by asking the support team: Support ticket
App: Tasks tab
 The TASKS tab will show you all upcoming DVR recording tasks, if you have a DVR subscription, including series recordings and one-shot recordings. You can cancel upcoming recordings by deleting the task (this won't delete any existing recordings for that timer), as well as change the priority order of series recordings.
- Info - Selecting a program row while the whole row is highlighted will show details about that program, the recording settings, and have options for deleting the upcoming task.
- Change priority - While a row is highlighted and pressing left, then select, will allow you to change the priority of series recordings. Press arrow up to move up, press arrow down to move down, and press select when done. The higher in the list, the higher priority. Single-shot programs will always have highest priority.
- Delete upcoming task - While a row is highlighted and pressing right, then select, will delete the upcoming recording task. It will not delete any recordings for that program, if any had already been made (this can be done from the RECORDED tab).
Upcoming:

Recording status marks:
The following marks will appear on upcoming programming details and tasks:
- Red dot - will record
- Gray dot - second showing of something scheduled to record. If the red dot channel fails at the time of recording, a gray dot channel can be used as a “backup”.
- Green tick - already recorded and exists on the DVR
- Gray tick - recorded and deleted, which tells the DVR to not re-record, unless the individual episode is selected for recording. This “don't re-record” history can be reset by asking the support team: Support ticket
Recordings can be set from:

- LIVE tab/view's action bar or future entries in the slice guide
- Selecting a future entry on the slice guide will open the information screen for that program, where you will have recording options for that specific episode or movie.
- Selecting the recording button on the action bar will record the program currently playing live.
- DISCOVER tab by selecting or searching for a program
- Selecting a show form the DISCOVER tab will show you all episodes for that show. You can set up a series recording or choose specific episodes to record.
- Grid guide by selecting a program
 Adding padding:
Padding sets a “safe” zone of extra time to record the program at the start and end of a program. The default padding is to add an extra 30 seconds at the start and end of a program. This can be especially useful for sporting events that may run long, or a channel is off in its timing and you want to prevent the end or start from being cut off.
Padding can also be changed for a series in the program information area, as you will see two new padding options show up in the window after a recording has been set for that show or series.
If you have a lot of back-to-back recordings that are on different channels, but only have a limited number of tuners, the extra padding can prevent the tuner from switching to the correct channel. The DVR software thinks that all tuners are “busy”, even though it's just 30 seconds late. If you know you have a lot of shows on around the same time, you may want to set their padding to 0 to prevent this.
Recording option - All episodes:
When doing a series recording “All episodes” will record both old and new episode of a show. The HDHomeRun DVR service will keep track of what recordings you have already made and prevent the same episode from being recorded twice. This is a good option if you want to collect all episodes of a show and want to build up a media library.
The episode options can also be changed later in the program information area.
If you need to re-record a specific episode, you will be given that option when you delete an episode from the HDHomeRun app's RECORDED tab.
Recording option - Current season:
When doing a series recording “Current season” will record only episodes that are new or are less than 90 days from originally airing. The HDHomeRun DVR service will keep track of what recordings you have already made and prevent the same episode from being recorded twice.
The episode options can also be changed later in the program information area.
Why not record just “new” episodes?
Since many users may have a limited number of HDHomeRun tuners, and can only record 2 or 4 channels at the same time, they might not be able to record an episode when it originally airs. Many shows will re-air a new episode shortly after it originally airs, often on the same day, but late at night. This option will allow the HDHomeRun DVR to still pick up the yet-to-be-viewed episode, despite it technically not being the very first airing.
Recording status marks:
The following marks will appear on upcoming programming details and tasks:
- Red dot - will record
- Gray dot - second showing of something scheduled to record
- Green tick - already recorded
- Gray tick - recorded and deleted (don't re-record)
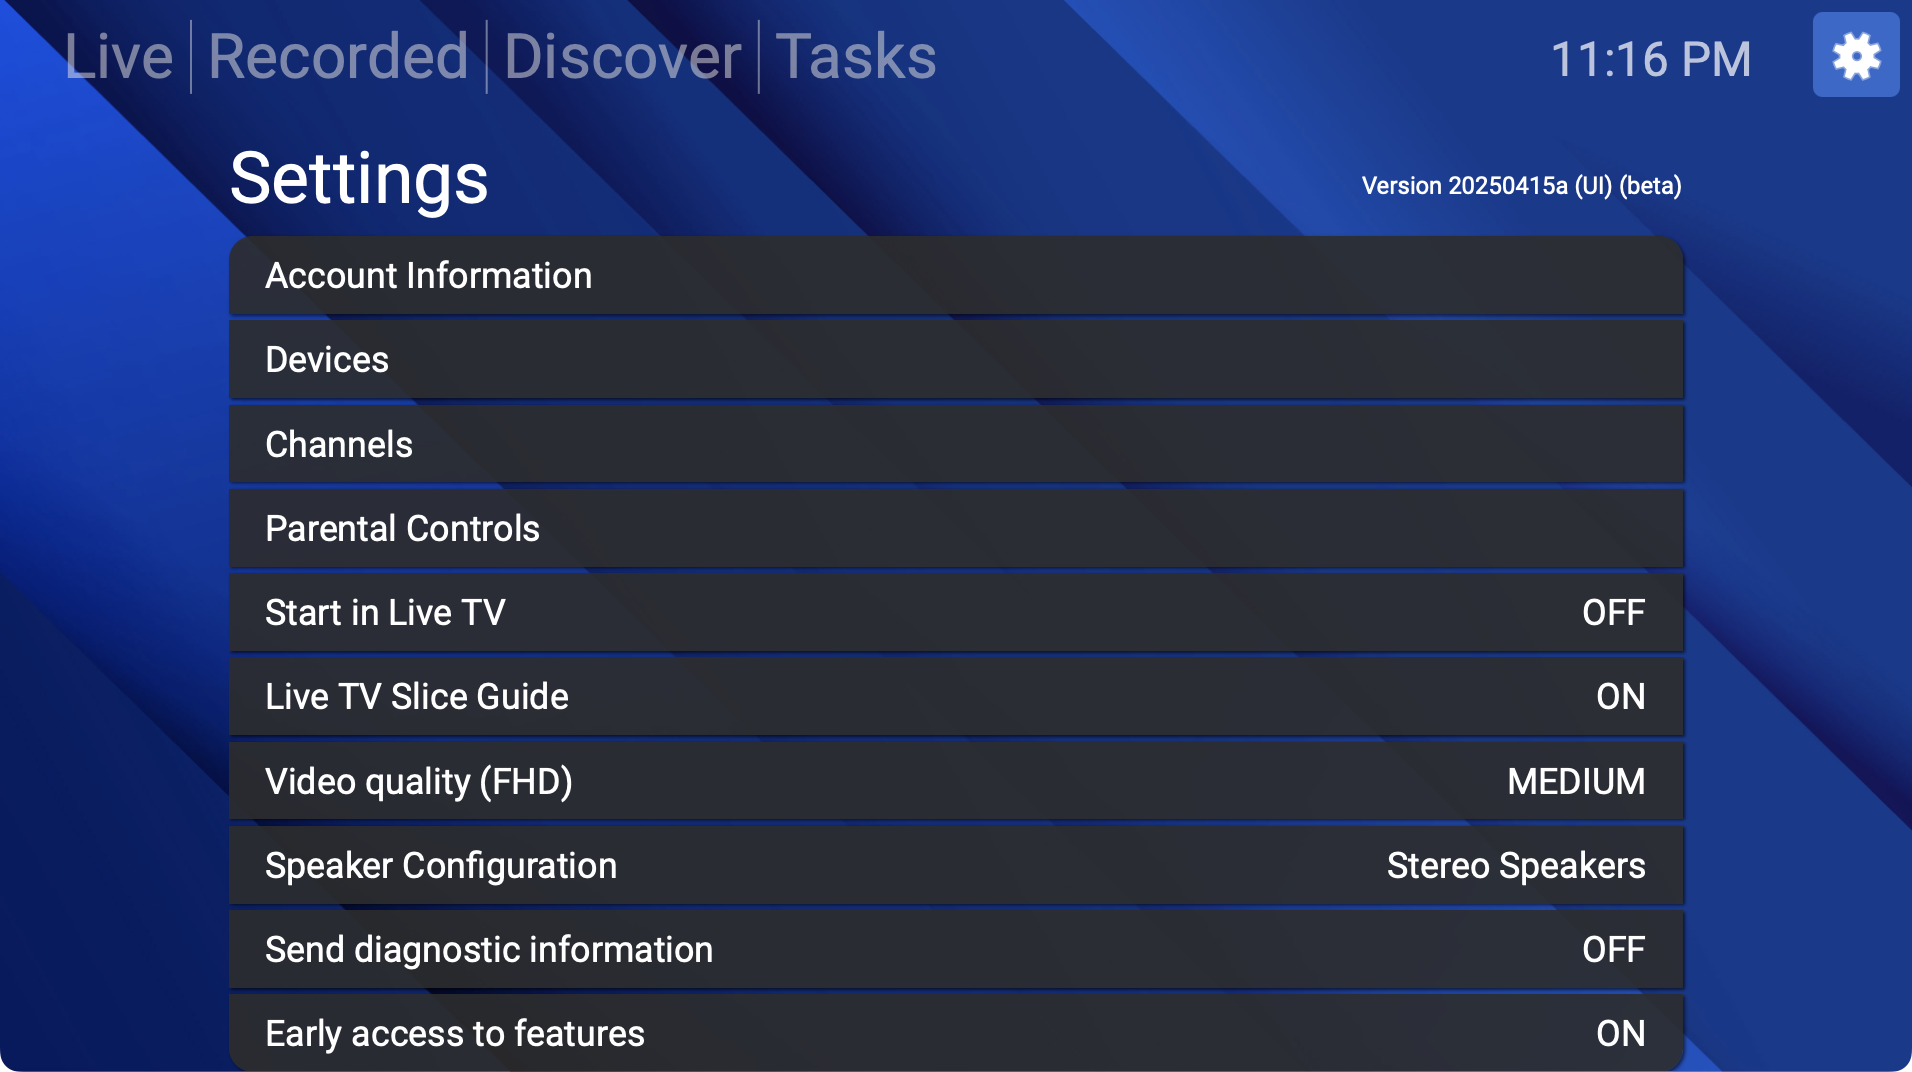 Account information
- Opens up the account information screen.
Starting page -
Shrink for television screen (Windows only) -
- Moves user interface controls inward slightly so that they are not cut off when the TV/display is set to “overscan”.
High quality video processing (some platforms) -
- If enabled, will use a higher quality deinterlacer and will preserve 60 fps on channels that are using 60 fps. If disabled, 60 fps will be dropped down to 30 fps.
If hardware decoding is used on a given platform, fps will be preserved regardless of setting.
Control master volume (some platforms) -
- If enabled the in-app volume controls (if present, depending on platform) controls the over-all device volume. If disabled, the in-app volume controls just the volume level for the HDHomeRun app.
Send diagnostic information -
- If you open a support ticket you may be asked to enable sending diagnostic information from the HDHomeRun app, which sends Silicondust support technicians diagnostic data about what the app is doing.
Use AC3 passthrough when possible (some platforms) -
- If enabled, and if the broadcast contains AC3 audio, the audio track will be sent untouched to optical or HDMI output for decoding on a connected audio receiver, sound bar, or TV. Sometimes this will improve audio quality and/or preserve multi-channel audio (5.1).
Because the audio is sent “untouched”, having this setting on may increase audio sync issues. Turning this setting off will allow the app to better time the audio to the video.
Use this device for making recordings (Android TV only, requires 500GB or larger connected drive) -
- Enabling this option will run the HDHomeRun DVR storage software as a service in the background, allowing the Android TV device to act as a DVR storage device even if the normal HDHomeRun app is not open.
Early access to features -
- Allow access to new UI elements that are still being tested and tweaked. This is different from running a beta version of the app, as it only affects the UI, which can be remotely updated and loaded.
Download
- Windows:
- Android:
- iOS:
- App for iPhone/iPad (opens iTunes Store)
- Mac:
Need a different option? HDHomeRun devices are supported by a number of additional viewing options.
DRM support
- See: DRM to see the requirements for viewing DRM-restricted US cable TV channels with the HDHomeRun app.